WooCommerce Plugin
1. Overview
The GLODIPAY WooCommerce Plugin integrates the GLODIPAY payment gateway into WooCommerce, enabling merchants to accept Credit/Debit Cards through a single unified platform.
Supported payment methods:
- Visa / Mastercard / JCB / Amex / Diners / Maestro / Discover
Checkout compatibility:
- WooCommerce Classic Checkout
- WooCommerce Block Checkout (Gutenberg)
2. Requirements
| Requirement | Minimum Version |
|---|---|
| WordPress | 5.8+ |
| WooCommerce | 7.0+ |
| PHP | 7.4+ |
| OpenSSL | Required |
OpenSSL is a security library used by the plugin to sign payment requests and verify webhook authenticity. It is pre-installed by default on most web hosting providers (cPanel, WP Engine, Cloudways, SiteGround, etc.) — no action needed. To verify: WordPress Admin → Tools → Site Health → Info → Server and look for an OpenSSL entry.
Server requirements for webhook reception:
- The merchant's site must be publicly accessible from the internet
- HTTPS required
- No IP/geo-blocking on the webhook endpoint
/?wc-api=glodipay_webhook
3. Installation
Prerequisites
Always create a backup of your website before installing or updating any plugin.
Step 1: Download the Plugin
Contact GLODIPAY to obtain the plugin ZIP file.
Step 2: Log in to WordPress Admin
Navigate to https://yoursite.com/wp-admin
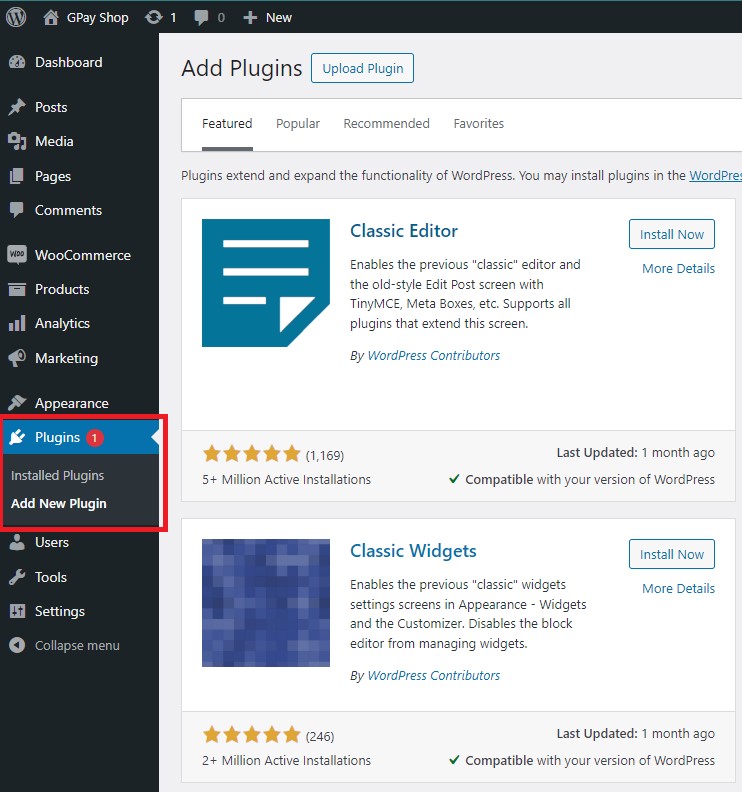
Step 3: Navigate to Add Plugins
Plugins → Add New Plugin
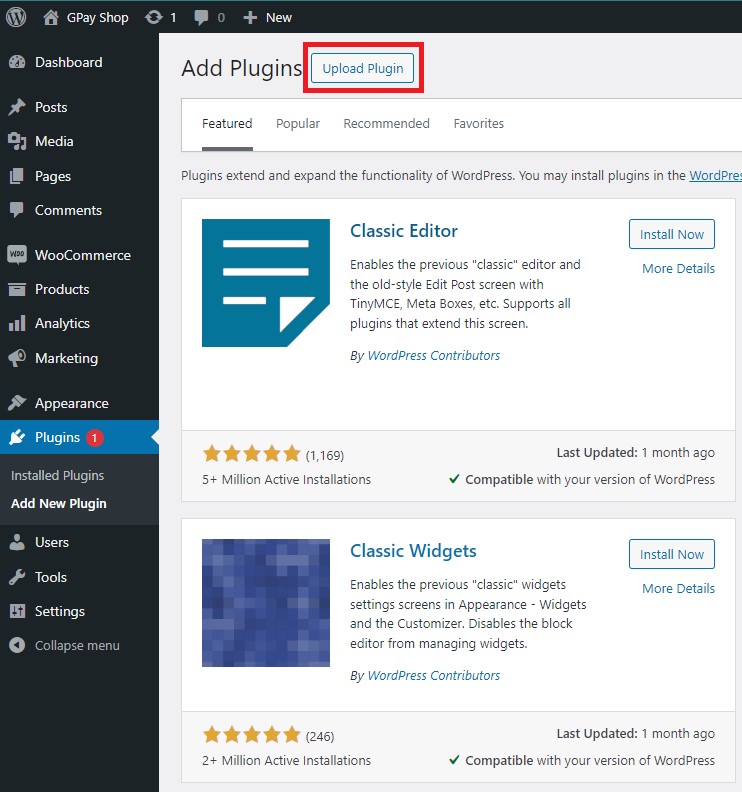
Step 4: Upload Plugin
Click "Upload Plugin" at the top of the Add Plugins page.
Step 5: Select ZIP File
Choose the ZIP file obtained from GLODIPAY.
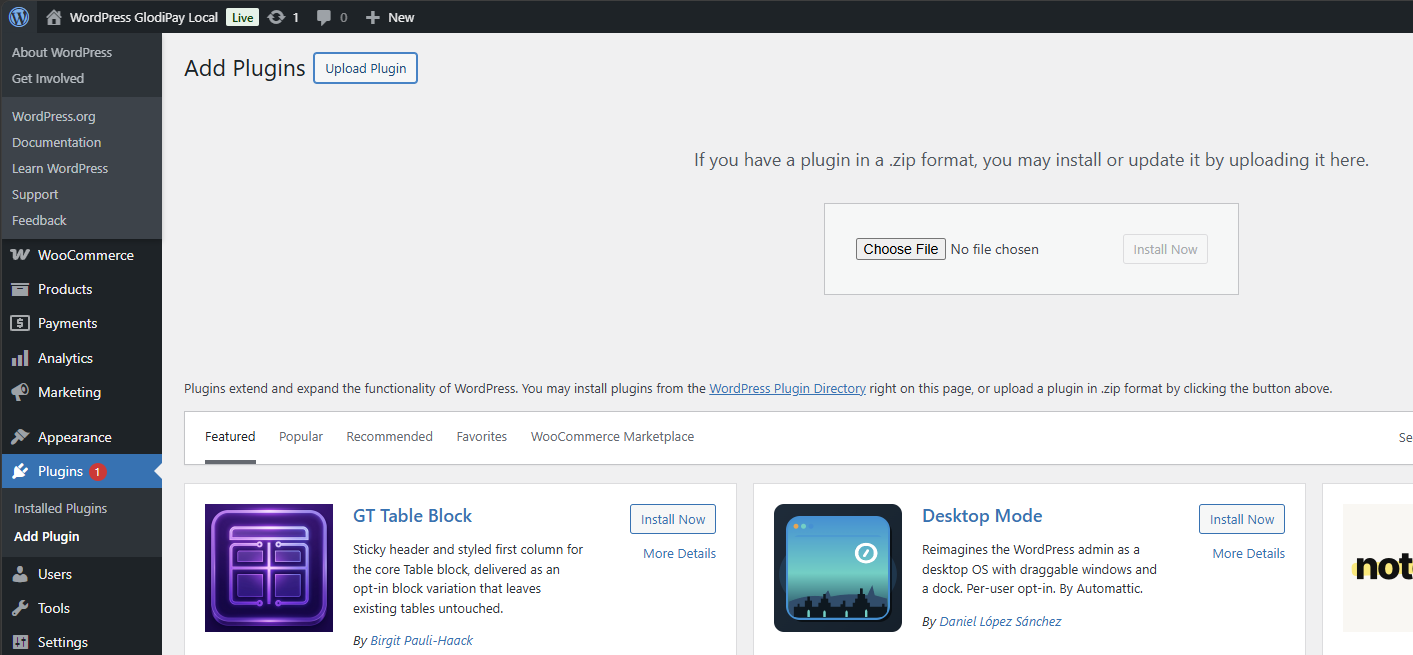
Step 6: Install
Once you have selected the ZIP file, click "Install Now" to proceed.
WordPress will install the plugin from the uploaded ZIP file.
Step 7: Activate
Click "Activate Plugin" after installation completes.
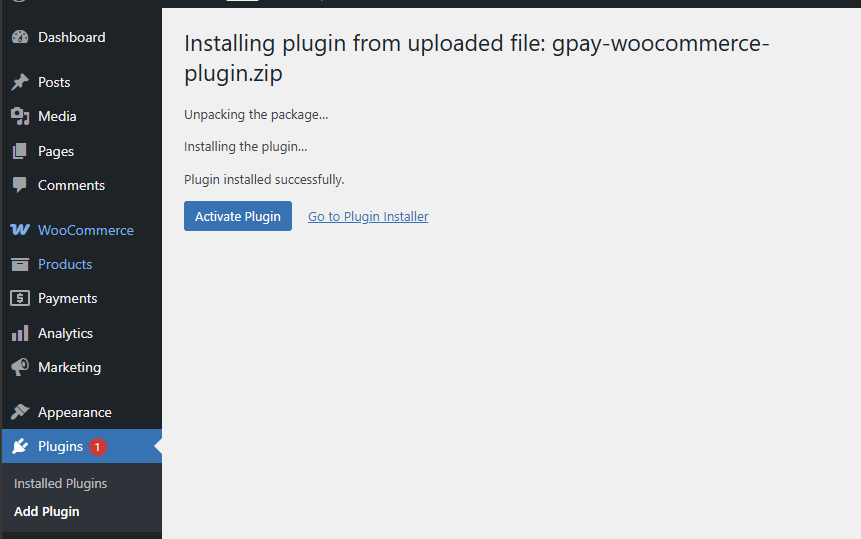
Alternatively, activate from Plugins → Installed Plugins → GLODIPAY Payment Gateway → Activate.
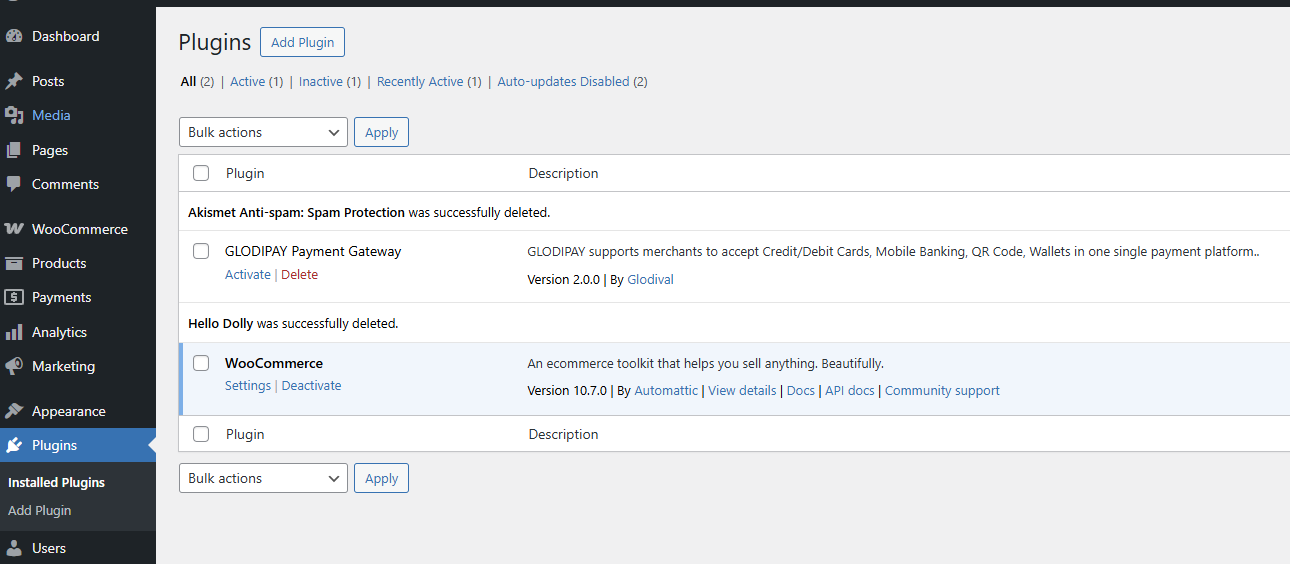
Step 8: Verify
Visit your checkout page to confirm the GLODIPAY payment option appears.
4. Configuration
Step 1: Access GLODIPAY Merchant
- Log in to your Merchant Account at the GLODIPAY Merchant
- Ensure email verification and KYB are completed
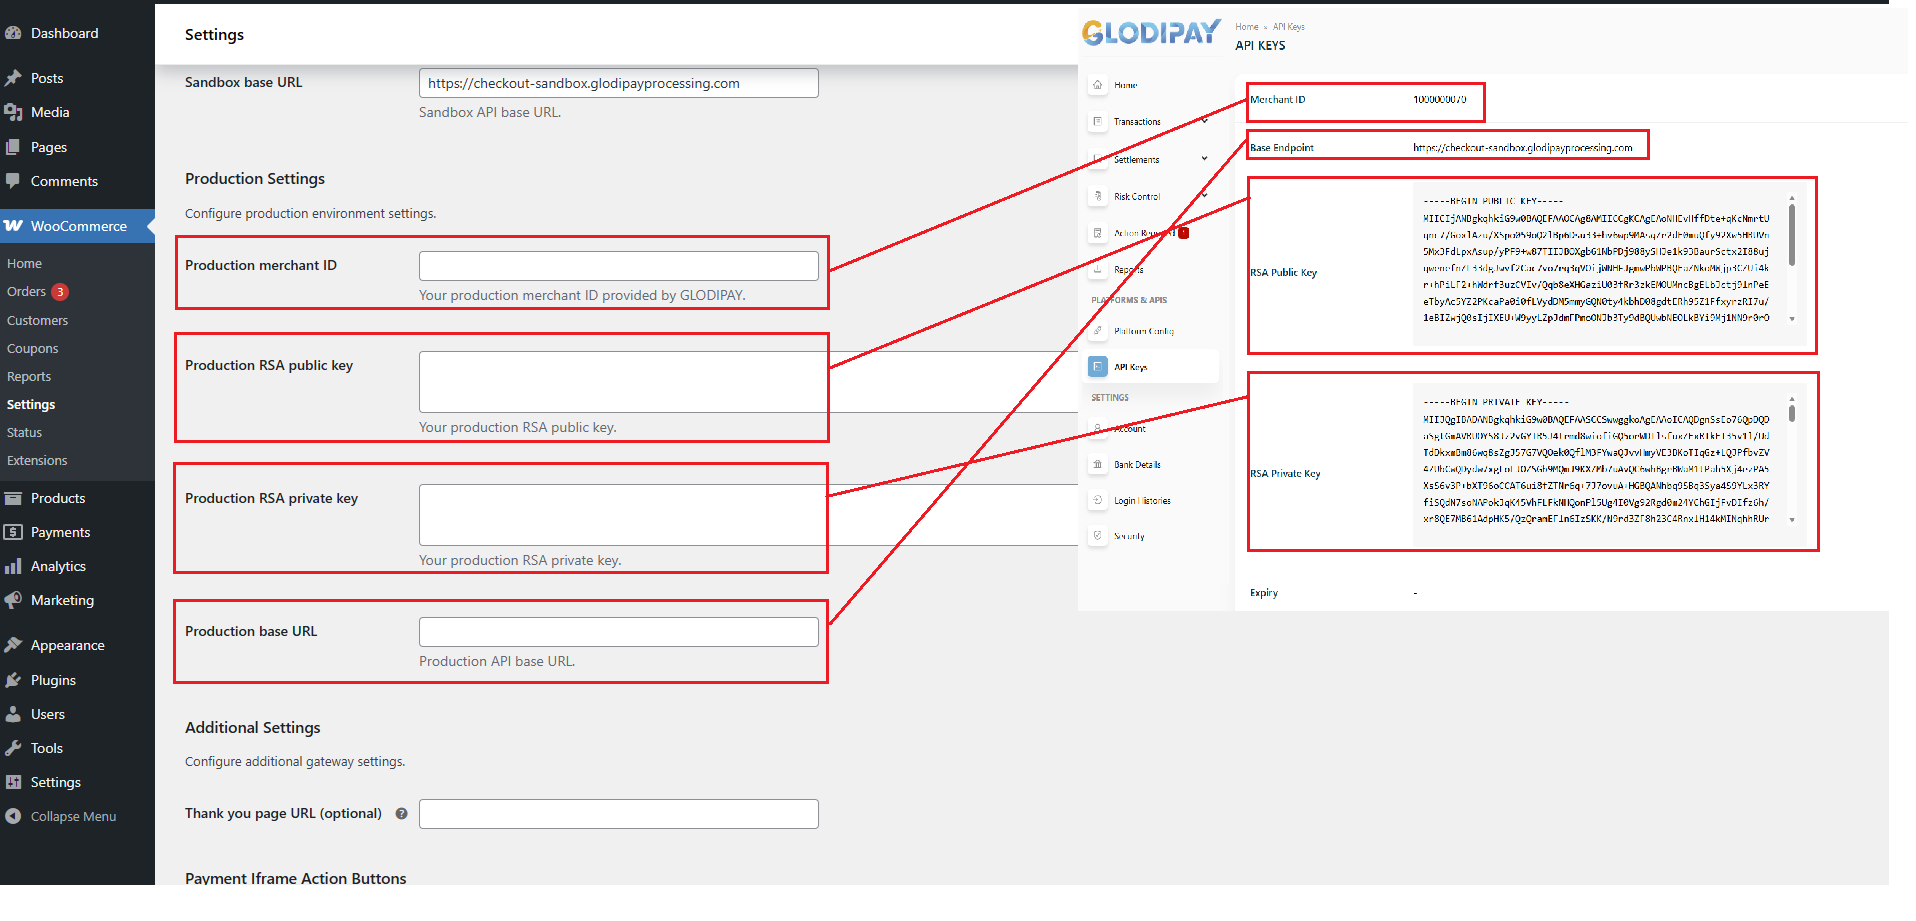
- Navigate to API Keys from the left menu
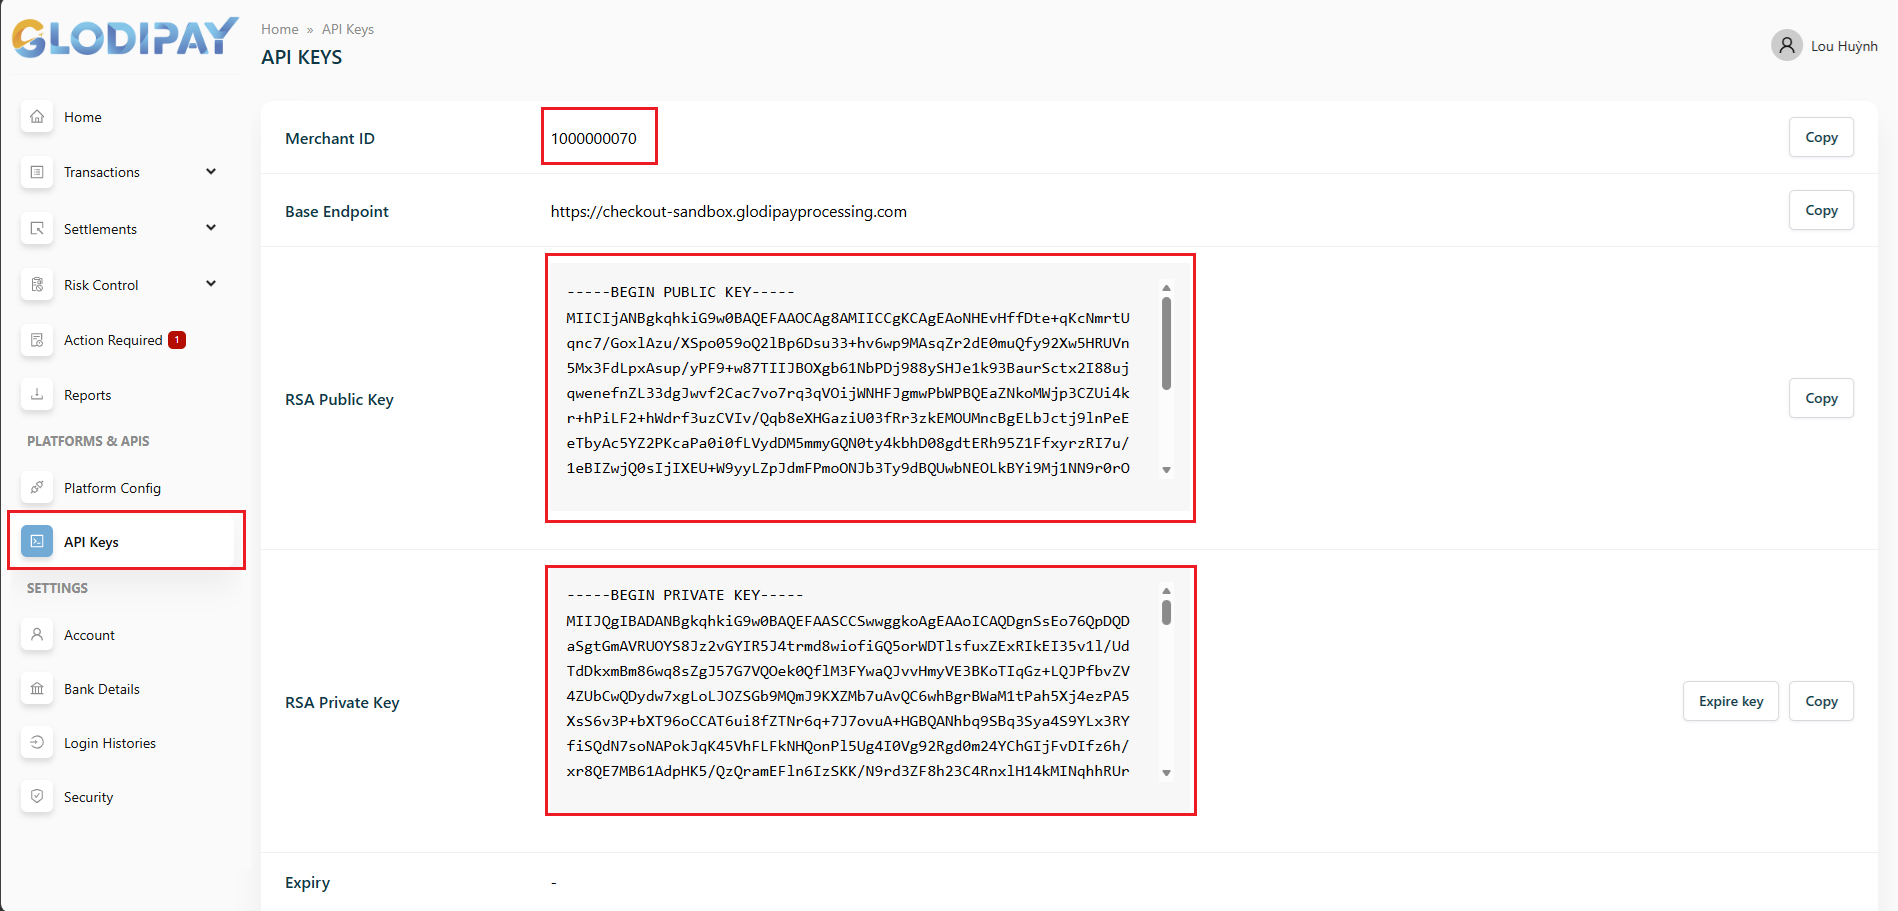
Step 2: Retrieve API Keys
From the API Keys section, copy:
| Key | Description |
|---|---|
| Merchant ID | Unique merchant identifier |
| Base Endpoint | API base URL (sandbox or production) |
| RSA Public Key | Used to verify webhook signatures |
| RSA Private Key | Used to sign payment requests |
| Expiration Date | Key expiry date |
Step 3: Configure the Plugin in WordPress
Navigate via either:
- Method 1: Plugins → GLODIPAY Payment Gateway → Settings
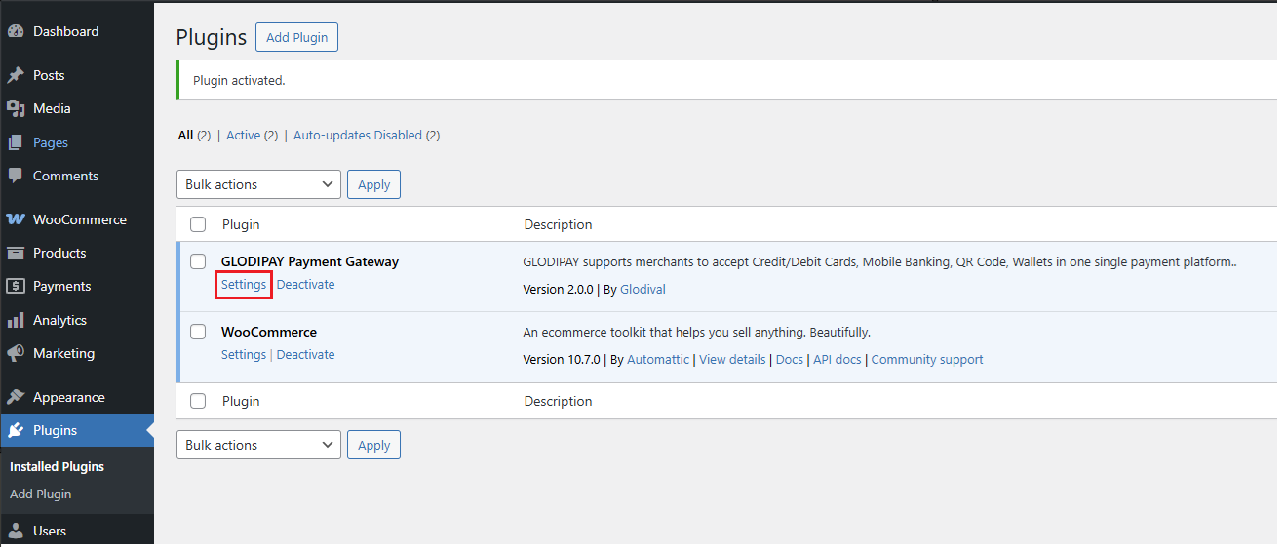
- Method 2: WooCommerce → Settings → Payments → GLODIPAY Payment Gateway → Manage
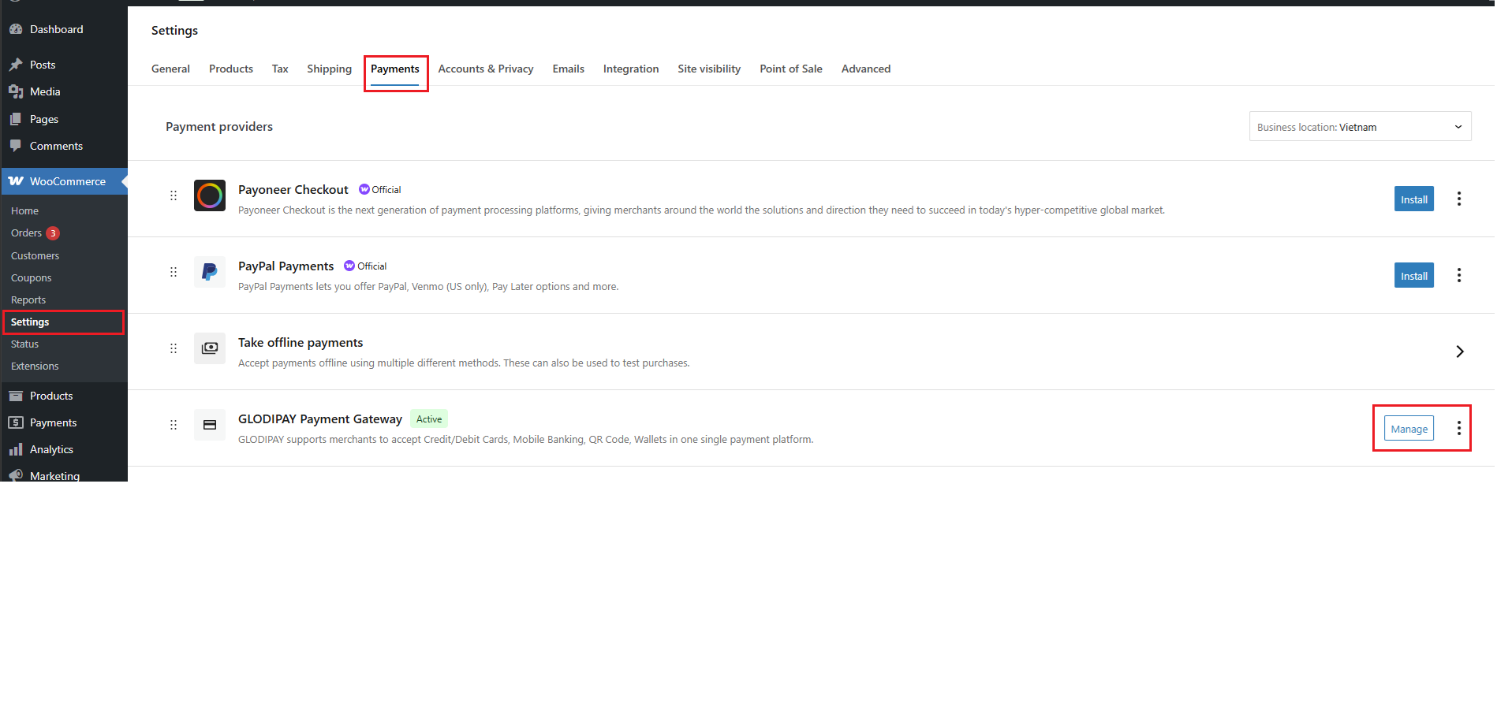
4.1 Basic Settings
| Setting | Description | Default |
|---|---|---|
| Enable/Disable | Activate the payment gateway | Enabled |
| Sandbox Mode | Toggle between Sandbox (test) and Production (live) | Disabled |
| Thank You Page URL | Custom redirect URL after payment. Leave blank to use WooCommerce default | (blank) |
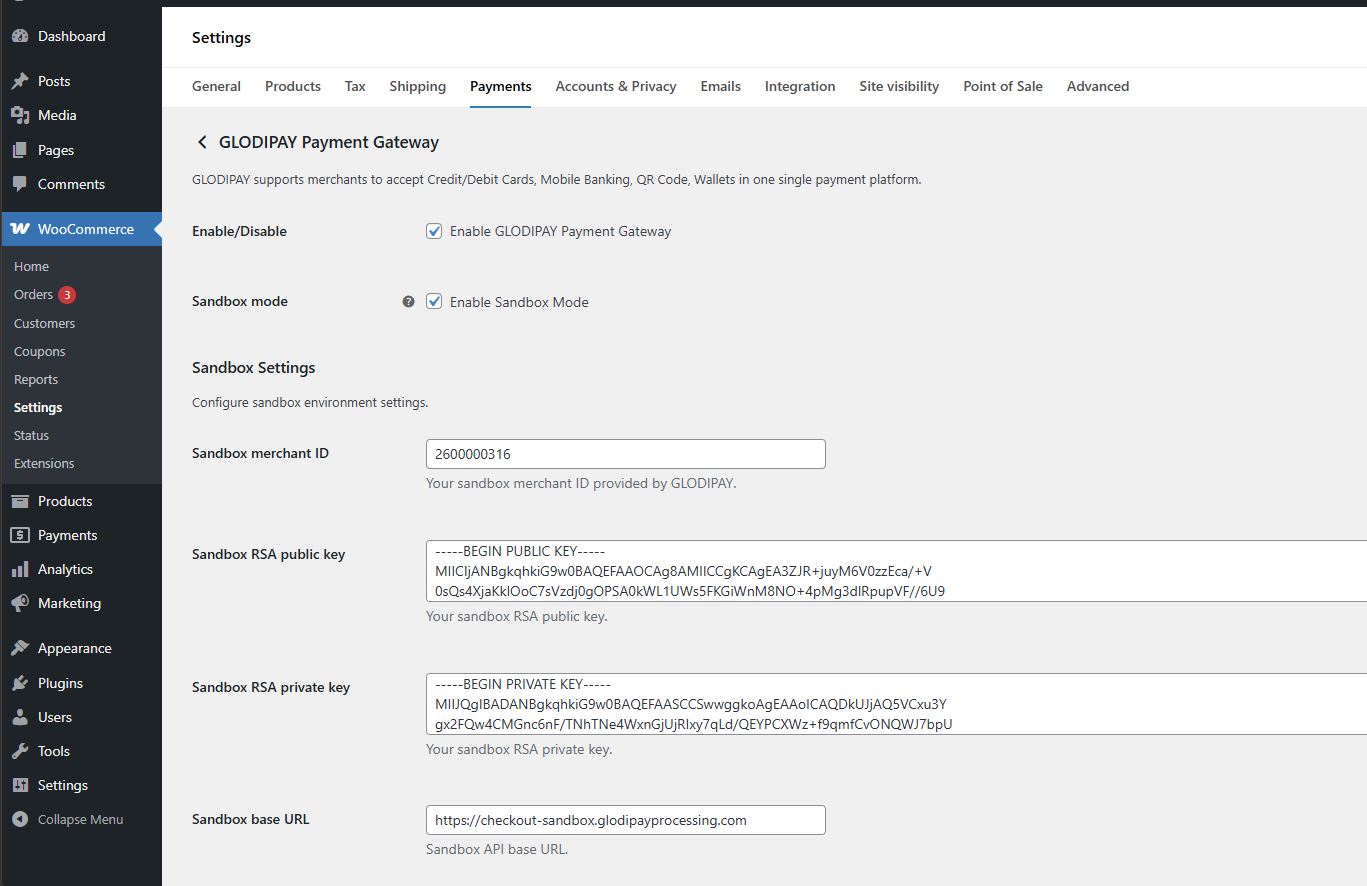
Important: Always test in Sandbox Mode before switching to Production.
4.2 API Keys
Sandbox Settings
| Field | Description |
|---|---|
| Sandbox Merchant ID | Merchant ID for test environment |
| Sandbox RSA Public Key | Public key for sandbox |
| Sandbox RSA Private Key | Private key for sandbox |
| Sandbox Base URL | Default: https://checkout-sandbox.glodipayprocessing.com |
Production Settings
| Field | Description |
|---|---|
| Production Merchant ID | Merchant ID for live environment |
| Production RSA Public Key | Public key for production |
| Production RSA Private Key | Private key for production |
| Production Base URL | Provided by GLODIPAY |
4.3 Payment Iframe Action Buttons
Customize the action buttons displayed on the payment overlay.
Refresh Button
| Field | Description | Default |
|---|---|---|
| Show Refresh Button | Display refresh button on iframe | Yes |
| Refresh Button Text | Button label text | Refresh |
| Refresh Button Color | Button background color (hex) | #0073aa |
Cancel Button
| Field | Description | Default |
|---|---|---|
| Show Cancel Button | Display cancel button on iframe | Yes |
| Cancel Button Text | Button label text | Cancel |
| Cancel Button Color | Button background color (hex) | #dc3232 |
4.4 Debug Settings
| Setting | Description | Default |
|---|---|---|
| Enable Debug Mode | Log detailed payment info to WooCommerce Logger | No |
| Block Checkout Debug | Additional logging for Block Checkout issues | No |
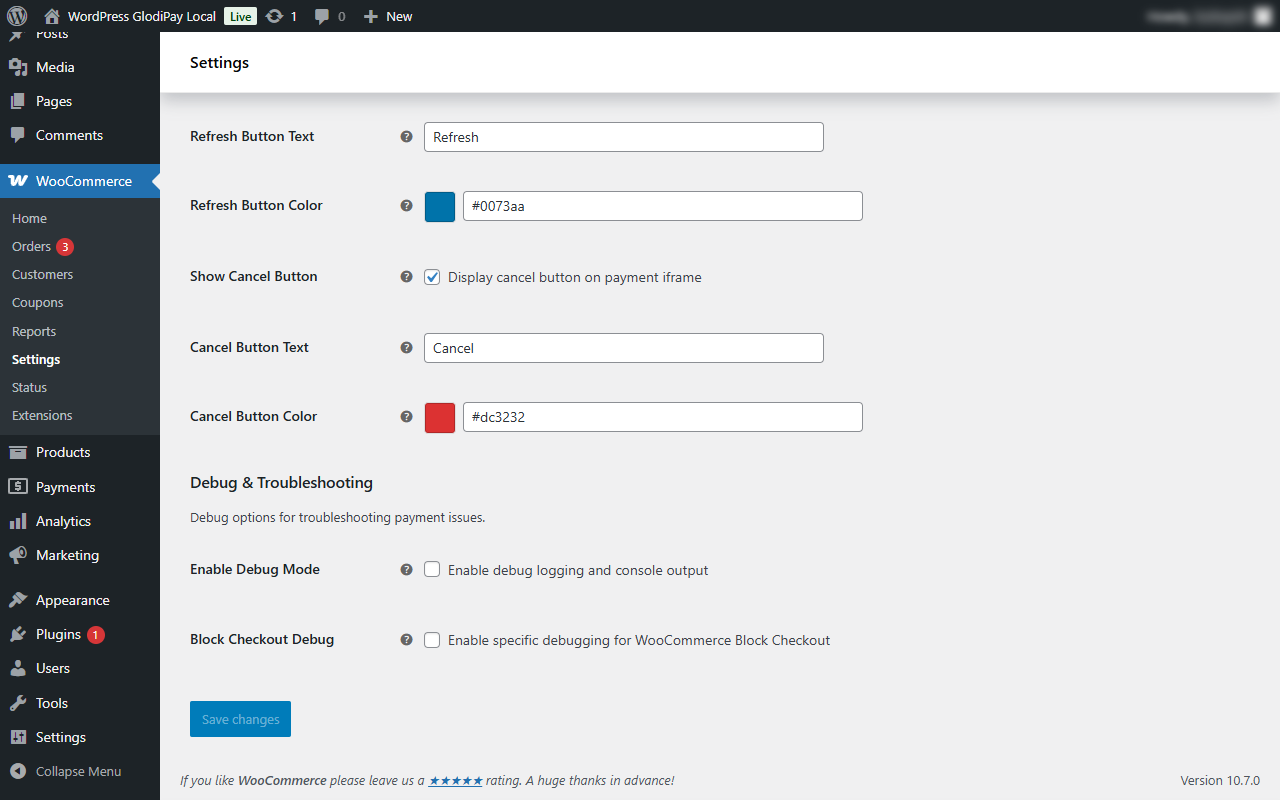
Note: Only enable debug mode during troubleshooting. Disable before going to production.
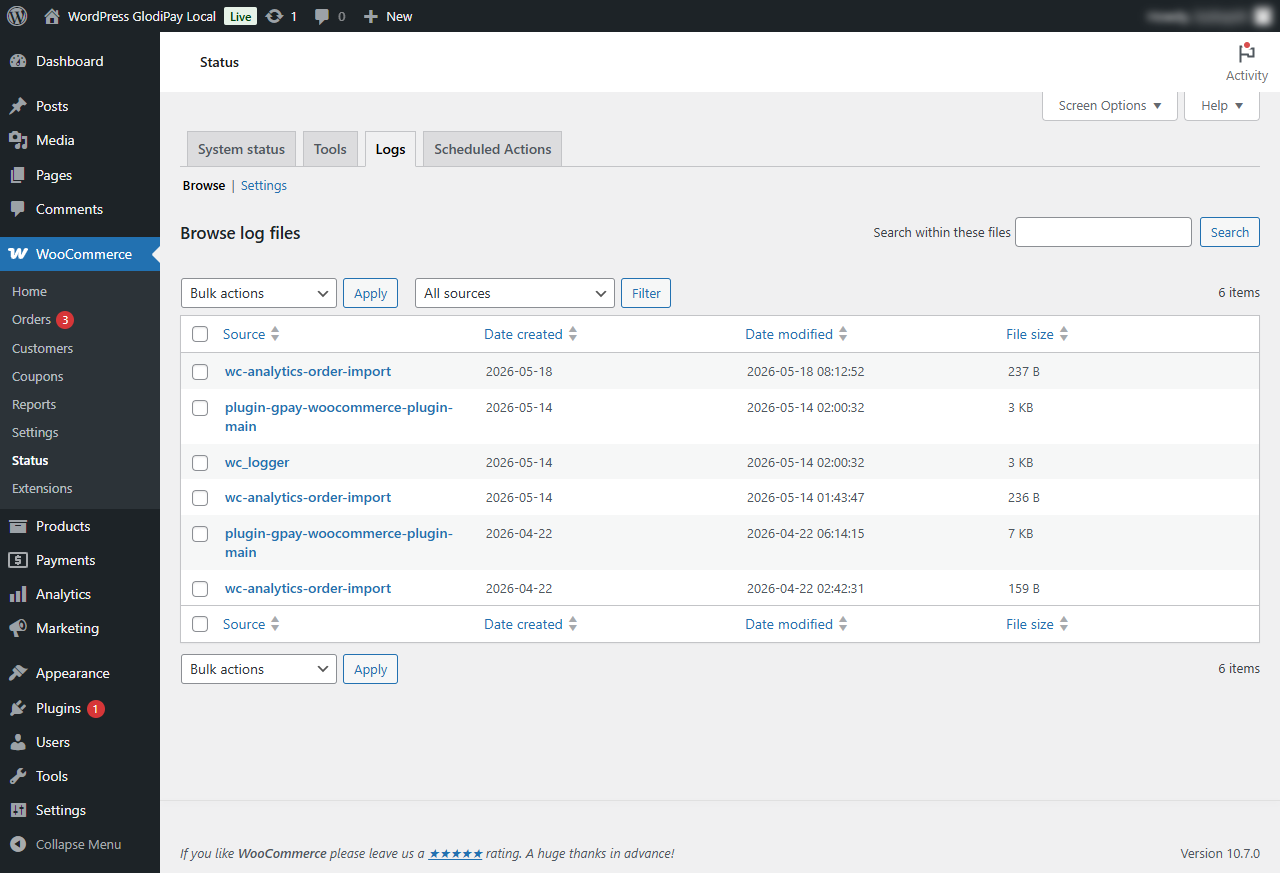
When debug mode is on, logs are available at: WooCommerce → Status → Logs
5. Payment Flow
5.1 Classic Checkout Flow
Customer fills checkout form
        ↓
Selects GLODIPAY as payment method
        ↓
Clicks "Place Order"
        ↓
WooCommerce creates order (status: pending)
        ↓
Plugin contacts GLODIPAY Gateway to create a payment
        ↓
Payment form loads in an overlay at the bottom of the page
        ↓
Customer completes payment inside the overlay
        ↓
GLODIPAY notifies the plugin of the payment result
        ↓
Plugin updates order status
        ↓
Customer is redirected to the Confirmation Page → Thank You page
5.2 Block Checkout Flow (Gutenberg)
Used when the checkout page is built with WooCommerce Blocks (Gutenberg editor):
Customer fills checkout form
        ↓
Selects GLODIPAY as payment method
        ↓
Clicks "Place Order"
        ↓
Plugin contacts GLODIPAY Gateway to create a payment
        ↓
Payment form loads in an overlay at the bottom of the page
        ↓
(same as Classic Checkout from here)
5.3 Payment Iframe Overlay
When payment is initiated, a payment panel slides up from the bottom of the screen containing:
- Title: "Complete Your Payment"
- Refresh button — reloads the payment form (configurable)
- Cancel button — cancels payment and reloads page (configurable)
- Warning message: "Transaction takes a few seconds to process. Don't close the page."
- Payment form — embedded GLODIPAY payment form
If the customer accidentally closes or refreshes the page, the payment panel will reappear automatically.
5.4 Information Sent to GLODIPAY
When a payment is initiated, the plugin automatically collects and sends the following information from the WooCommerce order to GLODIPAY:
- Order details (reference number, amount, currency)
- Customer billing information (name, email, phone, address)
- Customer shipping information (if different from billing)
- Payment return and notification URLs
- Site logo and customer IP address
No manual action is required — the plugin handles this automatically.
6. Confirmation Page
After completing payment inside the overlay, the customer is redirected to a confirmation page that displays the transaction result.
What the Confirmation Page Shows
- Transaction number
- Payment method used
- Transaction status
Status Polling
If the payment result is not yet available:
- The page automatically refreshes every 5 seconds
- Up to 10 retries
- After 10 retries without a confirmed result → customer is redirected to the Thank You page
If the payment is successful:
- A "Continue" button appears with a 30-second countdown
- Page automatically redirects to the Thank You page after countdown
Thank You Page
The customer is redirected to:
- The custom URL set in Thank You Page URL (plugin settings), if configured
- Otherwise, the default WooCommerce order confirmation page
Status Colors
| Status | Color |
|---|---|
successful | Green |
failed | Red |
error | Red |
under_review | Orange |
7. Webhook Integration
A webhook is an automatic notification that GLODIPAY sends to your site when a payment status changes. The plugin receives this notification and updates the WooCommerce order accordingly.
7.1 Webhook URL
GLODIPAY sends payment notifications to:
https://yoursite.com/?wc-api=glodipay_webhook&order_id=123
This URL is automatically configured by the plugin when a payment is created. No manual setup is required.
7.2 Signature Verification
All webhook notifications are digitally signed by GLODIPAY to confirm authenticity.
The plugin automatically verifies the signature on every incoming notification using the RSA Public Key configured in the plugin settings. No manual action is required.
If the signature is invalid: The notification is rejected and the order status is not updated. If orders remain stuck in pending after a successful payment, verify that the correct RSA Public Key is entered in the plugin configuration.
7.3 Webhook Notification Contents
When GLODIPAY sends a notification, it includes the following information. This is processed automatically by the plugin — no action required from the merchant.
| Information | Description |
|---|---|
| Order reference | Links the notification to the correct WooCommerce order |
| Transaction status | Payment result (successful, failed, under review) |
| Transaction ID | GLODIPAY's internal transaction identifier |
| Transaction number | Human-readable transaction number |
| Amount | Payment amount |
| Currency | Payment currency |
| Amount paid | Actual amount received |
| Settlement amount | Amount after fees |
| Payment method details | Card or payment method information |
| Fees | Fee breakdown |
7.4 Webhook Response
The plugin automatically sends a confirmation back to GLODIPAY upon receiving each notification. GLODIPAY uses this confirmation to mark the notification as successfully delivered.
7.5 Merchant Server Requirements
Critical: Webhook delivery will fail if GLODIPAY cannot reach your website.
Common causes of webhook failure:
| Cause | Symptom | Solution |
|---|---|---|
| Site not publicly accessible | Order stays pending after payment; no log entry | Ensure the site has a public domain and valid SSL |
| DNS not propagated | Webhook never arrives shortly after domain change | Wait for DNS propagation or check with a DNS lookup tool |
| IP / geo-blocking on merchant site | Webhook from GLODIPAY is blocked | Whitelist the GLODIPAY Gateway server IP in your firewall or security plugin |
| Firewall blocking incoming requests | Webhook never arrives | Allow inbound connections from all external IPs on the webhook URL |
| Site requires VPN or restricted access | GLODIPAY cannot reach the site | Remove access restrictions on /?wc-api=glodipay_webhook |
How to verify your site is accessible: Open the following URL in a browser or external tool to confirm it returns a response:
https://yoursite.com/?wc-api=glodipay_webhook
How to whitelist the GLODIPAY Gateway IP: Contact GLODIPAY support to obtain the current Gateway server IP addresses, then add them to your Cloudflare, firewall, or security plugin's allowlist.
8. Order Status Mapping
When GLODIPAY sends a payment notification, the plugin automatically updates the WooCommerce order to the corresponding status:
| GLODIPAY Status | WooCommerce Order Status | What happens |
|---|---|---|
successful | Processing | Order confirmed; product stock reduced; customer cart cleared |
failed | Failed | Payment failed; no stock change |
under_review | On Hold | Payment under review; order held pending manual check |
refund_successful | Unchanged | Refund issued by GLODIPAY — WooCommerce order status is not updated automatically |
refund_partially_successful | Unchanged | Partial refund issued by GLODIPAY — WooCommerce order status is not updated automatically |
Refunds: When a refund is issued through the GLODIPAY Merchant, the WooCommerce order status does not change automatically. You must manually update the order status and process the refund record in WooCommerce Admin → Orders.
9. Checkout Field Validation
The plugin validates billing and shipping fields when a customer places an order. This validation applies to all payment methods — not only GLODIPAY.
Important: If a required field is removed or disabled from the checkout page, customers will not be able to complete any order regardless of which payment method they select.
9.1 Required Billing Fields
The following fields must remain present and enabled on the checkout page:
| Field | Field ID | Maximum Length | Notes |
|---|---|---|---|
| First Name | billing_first_name | 255 characters | Required |
| Last Name | billing_last_name | 255 characters | Required |
| Email Address | billing_email | 255 characters | Required, must be valid email format |
| Phone Number | billing_phone | 5–20 characters | Required, minimum 5 characters |
| Address Line 1 | billing_address_1 | 255 characters | Required |
| City | billing_city | 255 characters | Required |
| Country | billing_country | — | Required |
Phone number: The phone field requires at least 5 characters. If a customer enters a phone number shorter than 5 characters, checkout will fail. Ensure your checkout form does not allow very short phone numbers.
9.2 Optional Billing Fields
These fields can be hidden if not needed. They are sent to GLODIPAY if filled in, but are not required to complete an order.
| Field | Field ID | Maximum Length |
|---|---|---|
| Address Line 2 | billing_address_2 | 255 characters |
| State / Region | billing_state | 255 characters |
| Postcode | billing_postcode | 25 characters |
9.3 Shipping Field Limits
Shipping fields are only validated when the customer checks "Ship to a different address". They are ignored if the customer uses the billing address for shipping.
| Field | Field ID | Maximum Length |
|---|---|---|
| First Name | shipping_first_name | 250 characters |
| Last Name | shipping_last_name | 250 characters |
| Address Line 1 | shipping_address_1 | 250 characters |
| Address Line 2 | shipping_address_2 | 250 characters |
| City | shipping_city | 250 characters |
| State / Region | shipping_state | 20 characters |
| Postcode | shipping_postcode | 10 characters |
9.4 Checkout Customization Compatibility
Using Checkout Field Editor plugins
If you use a plugin such as Checkout Field Editor for WooCommerce to customize checkout fields:
| Action | Field ID | Impact | Recommendation |
|---|---|---|---|
| Hide / disable Phone Number | billing_phone | Checkout blocked for all payment methods | Keep visible and required |
| Hide / disable First Name | billing_first_name | Checkout may fail; data missing from payment | Keep active |
| Hide / disable Last Name | billing_last_name | Checkout may fail; data missing from payment | Keep active |
| Hide / disable Email | billing_email | Checkout may fail; data missing from payment | Keep active |
| Hide / disable Address Line 1 | billing_address_1 | Checkout may fail; data missing from payment | Keep active |
| Hide / disable City | billing_city | Checkout may fail; data missing from payment | Keep active |
| Hide Address Line 2 | billing_address_2 | No error — safe to hide | Allowed |
| Hide State / Region | billing_state | No error — safe to hide | Allowed |
| Hide Postcode | billing_postcode | No error — safe to hide | Allowed |
| Reorder fields | — | No impact | Allowed |
| Change field labels | — | No impact | Allowed |
| Add extra custom fields | — | No impact on GLODIPAY | Allowed |
Note: Phone number validation runs for all payment methods. Even if GLODIPAY is not selected at checkout, an invalid phone number will block the order.
Using a page builder (Elementor, Divi, etc.)
If your checkout page is built with a page builder, ensure that all required billing fields listed in Section 9.1 are present in the checkout form. The GLODIPAY plugin is compatible with any theme or page builder that properly loads WooCommerce.
Adding custom fields to checkout
Adding custom fields to the checkout page does not affect GLODIPAY payment processing. If you need custom fields, contact your web developer or WooCommerce specialist.
10. Troubleshooting
Order Stuck in Pending After Payment
Symptoms: Customer completed payment but the order still shows as pending.
Diagnosis steps:
- Enable Debug Mode: WooCommerce → Settings → Payments → GLODIPAY Payment Gateway → Manage → Enable Debug Mode
- Reproduce the issue and check the log: WooCommerce → Status → Logs
- Check that your site is publicly accessible — open this URL from outside your network or use a tool:
https://yoursite.com/?wc-api=glodipay_webhook - Check if your site has a security plugin, firewall, or geo-restriction that could block incoming connections from GLODIPAY's servers
- Contact GLODIPAY support with the Order ID — they can check whether the notification was sent and what error occurred on their end
Common causes:
| Cause | How to identify | Fix |
|---|---|---|
| Site not publicly accessible | The webhook URL fails to load from external tools | Ensure the site has a live domain with valid SSL |
| IP or geo-restriction | Site only loads via VPN or from certain countries | Remove access restrictions on the webhook URL |
| Firewall blocking incoming connections | No log entries after payment | Open inbound access; add GLODIPAY IP to allowlist (contact support for IP) |
| Incorrect RSA Public Key | Log shows signature verification failed | Re-copy the RSA Public Key from GLODIPAY Merchant → API Keys |
Manual fix for stuck orders:
WooCommerce Admin → Orders → Select Order → Change status to Processing → Save
Payment Form Not Appearing
- Verify the plugin is active: Plugins → Installed Plugins → GLODIPAY Payment Gateway
- Verify API keys are entered: WooCommerce → Settings → Payments → GLODIPAY Payment Gateway → Manage
- Try a different browser or disable browser extensions
- Enable Debug Mode in plugin settings and check the log: WooCommerce → Status → Logs
Customer Returns to Checkout — Payment Form Reappears
This is expected behavior. If a customer navigates back to the checkout page after initiating a payment, the plugin displays the existing payment form again instead of creating a new payment. This prevents duplicate charges.